Introduction
Welcome to our guide on capturing screenshots in Linux! As a Linux user, you have several options for taking screenshots, ranging from built-in keyboard shortcuts to specialized tools. In this tutorial, I'll walk you through various methods you can use to capture screenshots on your Linux system.
Using Built-in Keyboard Shortcuts
Linux offers some handy keyboard shortcuts for taking screenshots:
Print Screen (PrtSc): Pressing this key captures the entire screen.
Alt + Print Screen: Pressing these keys together captures only the active window.
GNOME Screenshot Tool
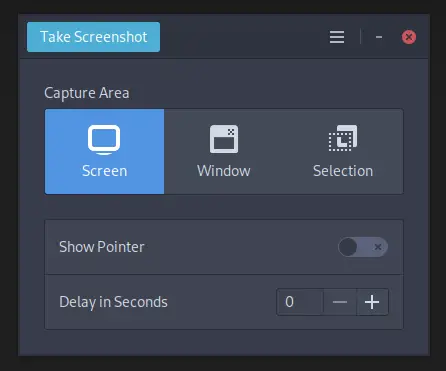
If you're using the GNOME desktop environment, you can take advantage of the GNOME Screenshot utility.
Even if you're not using the GNOME desktop environment, you can still install and use the GNOME Screenshot utility:
Install GNOME Screenshot using your package manager (e.g.,
sudo apt install gnome-screenshotfor Debian-based systems).Access GNOME Screenshot by searching for it in the application menu or launching it from the terminal with the command
gnome-screenshot.Features include capturing specific areas, adding delays, and choosing where to save the screenshots.
KDE Spectacle
For KDE Plasma users, the default screenshot tool is Spectacle:
Launch Spectacle from the application menu or by pressing Alt + F2 and typing
spectacle.You can capture the full screen, a specific window, or a custom region with Spectacle.
Command-Line Tools
If you prefer using the command line, Linux offers some powerful screenshot utilities:
scrot:A command-line tool for taking screenshots.import:Part of the ImageMagick suite, allows for capturing screenshots and saving them as images.
You can use scrot and import like this:
#!/bin/bash
#
# script using import to save a screenshot of the desktop
#
filename="screenshot-$(date '+%Y-%m-%d--%H-%M-%S').png"
#scrot "/tmp/$filename"
import -window root "/tmp/$filename"
if [[ "$1" == "1" ]]
    then
          convert "/tmp/$filename" -crop 1366x768+0+0 "/tmp/$filename"
    else
          convert "/tmp/$filename" -crop 1920x1080+1366+0 "/tmp/$filename"
fi
mv "/tmp/$filename" "${HOME}/Pictures/$filename"
mpv --no-config  ${HOME}/.i3/Nikon.ogg
Shutter
Shutter is a feature-rich screenshot tool available for Linux:
Install Shutter using your package manager or download it from the official website.
Features include annotations, editing, and sharing options.
Flameshot
Flameshot is a lightweight screenshot tool with annotation features:
Install Flameshot from your distribution's software repository.
It offers simplicity and speed, making it a popular choice among users.
Other Notable Methods
In addition to the methods mentioned above, you can also use browser extensions or third-party software for taking screenshots on Linux. However, these may have their own pros and cons, so it's essential to choose the one that best fits your needs.
Conclusion
Capturing screenshots in Linux is easy and versatile, thanks to the various methods available. Whether you prefer built-in keyboard shortcuts, desktop utilities like GNOME Screenshot and Spectacle, or third-party tools like Shutter and Flameshot, there's something for everyone. Experiment with different methods to find the one that works best for you!









0 Comments, latest