How to Create Circular Profile Pictures in LaTeX: A Step-by-Step Guide
Category: Latex
Date: 9 months ago
Views: 635
In today's digital age, presenting oneself professionally is paramount, whether it's for a CV, seminar poster, or professional profile. A key element of this presentation is the profile picture. While rectangular images are common, circular profile pictures can add a touch of elegance and professionalism to your documents. In this tutorial, we'll explore how to create circular profile pictures in LaTeX, a powerful typesetting system widely used for academic and professional documents.
Step 1: Preparing the LaTeX Environment
To begin, ensure you have LaTeX installed on your system. LaTeX distributions such as TeX Live and MiKTeX are freely available and easy to install on most operating systems.
Step 2: Writing the LaTeX Code
Below is a sample LaTeX code that creates circular profile pictures:
\documentclass{standalone}
\standaloneconfig{margin=2mm}
\usepackage{tikz}
\usepackage{graphicx}
\usepackage{ragged2e}
% Define the radius of the outer circle
\def\outerRadius{2.2cm}
% Define the radius of the inner circle
\def\innerRadius{2cm}
% Get the natural width of the image
\newlength{\imgwidth}
\newcommand\pic[2]{
\begin{tikzpicture}
\begin{scope}
\draw[yellow] (0,0) circle (\outerRadius);
\draw[yellow] (0,0) circle (\innerRadius);
\fill[yellow] (0,0) circle (\outerRadius) -- (0,0) circle (\innerRadius);
% Clip the image to the shape of the inner circle
\clip (0,0) circle (\innerRadius);
% Calculate the correct width to fit the image perfectly inside the inner circle
\settowidth{\imgwidth}{\includegraphics{#1}}
\pgfmathsetmacro{\scalefactor}{\innerRadius / (0.5 * \imgwidth)}
% Include the image inside the inner circle with the calculated width
\node at (0,0) {\includegraphics[scale=\scalefactor]{#1}};
\end{scope}
\node[blue,below, font=\Large\bfseries, align=center, inner sep=2pt, minimum width=2cm, minimum height=2cm, text width=3.5cm, text badly centered] at (0,-\outerRadius) {\Centering #2};
\end{tikzpicture}
}
\begin{document}
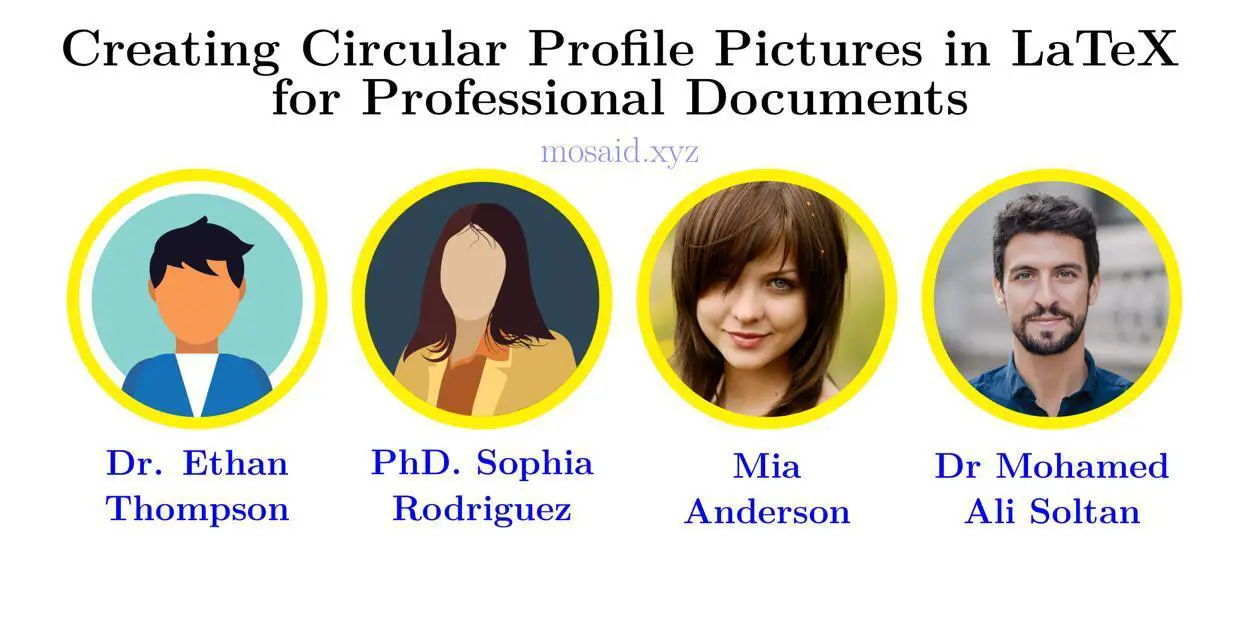
\pic{outputimage.jpg}{Dr. Ethan Thompson}
\pic{female.png}{PhD. Sophia Rodriguez}
\pic{13mlw3.jpg}{Mia Anderson}
\pic{ef153.jpg}{Dr Mohamed Ali Soltan}
\end{document}
It will give this figure:

Explanation
- The LaTeX code utilizes the
standalonedocument class to generate standalone images. - It makes use of the
tikzpackage for drawing graphics and thegraphicxpackage for including images. - The
\piccommand is defined to create circular profile pictures with names or titles below them.
Conclusion
In conclusion, by following the steps outlined in this tutorial, you can easily create circular profile pictures in LaTeX for use in CVs, seminar posters, and other professional documents. This simple yet effective technique adds a touch of professionalism to your presentations, helping you stand out in the competitive world of academia and beyond. Experiment with different styles and sizes to find the perfect look for your documents. Happy typesetting!
Related Articles


Most Recent Articles


Most Viewed Articles


0 Comments, latest