How to Create Beautiful Atomic Structures with TikZ and LaTeX
Category: Latex
Date: April 2023
Views: 2.36K
In this article I am going to show you how to draw an atom nuclei and visualize the protons and neutrons, as always using the powerful Tikz package from Latex. so let's get started
it all starts with protons and neutrons
using the following command we will define the protons and neutrons by defining them like so:
pics/proton/.style={code={\shade[ball color=red] circle (3pt);}},
pics/neutron/.style={code={\shade[ball color=white] circle (3pt);}},
using the above commands we will be able to draw little red and white balls whenver we call \pic (x,y) {proton}; . afterward we will add the following code:
\pgfmathsetseed{#1+1}
\foreach \A/\R in {8/0.2, 5/0.13, 1/0}{
\pgfmathsetmacro{\S}{360/\A}
    \foreach \B in {0,\S,...,360}{
	\pgfmathrandomitem{\C}{nucleon}
	\pic at ($(\B+2*\A+5*rnd:\R)$) {\C}; } }} },
this essentially defines another pic command called nucleussmall , in this macro we start by declaring a random list using \pgfmathdeclarerandomlist , this list contains 2 protons and 3 neutrons, when this list is called later it will generate random protons and neutrons each with a 2/5 and 3/5 probability respectively.
-
\pgfmathsetseed{#1+1}This line sets the seed for the random number generator. The seed is set based on a given parameter #1 passed to the pic, which ensures that each instance of the pic will have a different arrangement of nucleons.
-
\foreach \A/\R in {8/0.2, 5/0.13, 1/0}This line starts a loop that will create three rings of nucleons with decreasing radii. The variable \A is used to control the number of nucleons in each ring, while \R is used to set the radius of the ring.
-
Next we calculate the angle between each nucleon in the current ring based on the number of nucleons \A in the ring. using
\pgfmathsetmacro{\S}{360/\A}. this will define the variable\Sthat will be used in the next loop -
the next 3 lines will start a for loop that calls the random list we created before and get a random nucleon
\Cand draw it using the first pic we defined. \pic at ($(\B+2*\A+5*rnd:\R)$) {\C};This line places a nucleon of the type stored in\Cat a random position on the current ring. The position is determined by adding a random offset to the current angle\B, the current ring radius\R, and a factor of the current ring size\A. The($...$)syntax uses coordinate calculation from the calc TikZ library to compute the position of the nucleon.
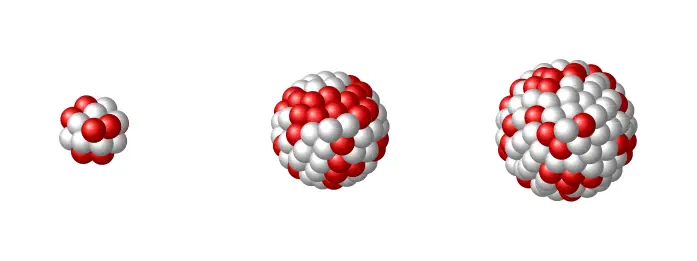
And that's pretty much it. we do the same logic to define bigger nuclei, and here is the full document:
\documentclass{standalone}
\usepackage{tikz}
\usetikzlibrary{calc}

\begin{document}

\begin{tikzpicture}
\tikzset{
    pics/proton/.style={code={\shade[ball color=red] circle (3pt);}},
    pics/neutron/.style={code={\shade[ball color=white] circle (3pt);}},
    pics/nucleussmall/.style={code={%
        \pgfmathdeclarerandomlist{nucleon}{{proton}{proton}{neutron}{neutron}{neutron}}
        \pgfmathsetseed{#1+1}
        \foreach \A/\R in {8/0.2, 5/0.13, 1/0}{
        \pgfmathsetmacro{\S}{360/\A}
            \foreach \B in {0,\S,...,360}{
                \pgfmathrandomitem{\C}{nucleon}
                \pic at ($(\B+2*\A+5*rnd:\R)$) {\C}; } }} },
    pics/nucleusbig/.style={code={%
        \pgfmathdeclarerandomlist{nucleon}{{proton}{proton}{neutron}{neutron}{neutron}}
        \pgfmathsetseed{#1+1}
        \foreach \A/\R in {24/0.4, 24/0.3, 24/0.2, 13/0.35, 11/0.27, 6/0.15, 1/0}{
        \pgfmathsetmacro{\S}{360/\A}
            \foreach \B in {0,\S,...,360}{
                \pgfmathrandomitem{\C}{nucleon}
                \pic at ($(\B+2*\A+5*rnd:\R)$) {\C}; } }} },
    pics/nucleusbiggest/.style={code={%
        \pgfmathdeclarerandomlist{nucleon}{{proton}{proton}{neutron}{neutron}{neutron}}
        \pgfmathsetseed{#1+1}
        \foreach \A/\R in {24/0.5, 24/0.4, 24/0.3, 24/0.2, 13/0.47, 15/0.44, 13/0.37, 11/0.27, 6/0.15, 1/0}{
        \pgfmathsetmacro{\S}{360/\A}
            \foreach \B in {0,\S,...,360}{
                \pgfmathrandomitem{\C}{nucleon}
                \pic at ($(\B+2*\A+5*rnd:\R)$) {\C}; } }} },
    }
\pic at (0,0) {nucleussmall};
\pic at (2,0) {nucleusbig=1};
\pic at (4,0) {nucleusbiggest=1};
\end{tikzpicture}
\end{document}















0 Comments, latest