Complete Tutorial: Creating Categories and Subcategories Using Pages in Pelican
Introduction: Why Static Websites Can Beat Dynamic Ones
In the web development world, dynamic websites built with platforms like WordPress, Flask, or Laravel often get all the attention. They provide databases, admin dashboards, and real-time interactivity. However, there’s a quiet champion that often goes overlooked: the static website.
Static websites, like the ones built with Pelican, are incredibly fast, secure, and require very little maintenance. There’s no backend database to worry about, no server-side code that can break or get hacked, and the speed is unmatched because the server simply delivers pre-built HTML files.
What’s even better? You can simulate categories and subcategories using only pages and folders, without complex taxonomies or dynamic systems. Let me walk you through the process step-by-step, using my actual setup.
1. Setting Up Your Python Environment and Pelican Project
Let’s start from scratch.
•Create a new Python environment: It’s always a good idea to isolate your project.
python3 -m venv env
source env/bin/activate
•Install Pelican:
pip install "pelican[markdown]"
pip install pelican-sitemap pelican-related-posts pelican-neighbors pelican-render-math pelican-jinja2content
•Create your Pelican project:
pelican-quickstart
You’ll be asked a few questions:
- The site title
- Your author name
- The site URL (you can leave it empty for now)
Pelican will create a basic directory structure for you.
my-pelican-site/
├── content/
│   ├── articles/      # Optional if you write articles
│   ├── pages/         # General pages (about, contact, etc.)
│   ├── courses/       # Structured content for courses
│   ├── images/        # Static images
│   ├── pdfs/          # Static PDFs
│   └── extra/         # Additional files
├── output/            # Generated static site (HTML files) after building
├── pelicanconf.py     # Main configuration file
├── publishconf.py     # Production-specific settings (optional)
├── tasks.py           # Optional automation script
├── Makefile           # For quick commands like `make html` and `make serve`
├── requirements.txt   # Python dependencies (optional but recommended)
├── theme/             # Your custom Pelican theme
│   ├── templates/     # Jinja2 HTML templates
│   └── static/        # Theme-specific CSS, JS, images
└── pelican-plugins/   # Pelican plugins folder (if local)
2. Understanding the Key Components of a Pelican Project
Here’s what matters for our goal:
•content/ — where you will write your pages, courses, articles, etc.
•output/ — the generated static website (HTML files, ready to publish).
•pelicanconf.py — the main configuration file.
•themes/ — where you can customize the design of your website.
We will mostly focus on:
Organizing the content/ folder
Writing rich Markdown files with metadata
Configuring pelicanconf.py properly to simulate categories and subcategories using folders.
3. Setting Up Your Pelican Configuration
Here’s a stripped version of my real configuration focused on pages and folder hierarchy:
AUTHOR = 'your author name'
SITENAME = 'your site name'
SITEURL = ''

PATH = 'content'
TIMEZONE = 'UTC'
DEFAULT_LANG = 'en'

PLUGIN_PATHS = ['pelican-plugins']
PLUGINS = ['sitemap', 'related_posts', 'neighbors', 'render_math', 'jinja2content']

THEME = 'theme'
STATIC_PATHS = ['images', 'courses', 'extra', 'theme/static', 'pdfs']

PAGE_PATHS = ['pages', 'blogs', 'courses']

PAGE_URL = '{slug}.html'
PAGE_SAVE_AS = '{slug}.html'

PAGE_URLS = {'courses': 'courses/{subject}/{schoolyear}/{slug}.html'}
PAGE_SAVE_AS_TEMPLATES = {'courses': 'courses/{subject}/{schoolyear}/{slug}.html'}

DEFAULT_PAGINATION = 7

DIRECT_TEMPLATES = ['index', 'categories', 'tags', 'archives', 'courses']
Key Notes:
✔️ We tell Pelican where to find pages: 'pages', 'blogs', 'courses'
✔️ We build URLs for courses based on metadata: subject and school year.
✔️ We don’t use articles here because we’re simulating categories with pages.
4. How to Create a Page (with Metadata)
You can create a page by writing a Markdown file inside content/pages/ or content/courses/.
Here’s a basic example for a course page:
Create it as content/courses/mathematics/course-1.md
Title: Course 1
Date: 2025-06-24
Type: course
Subject: mathematics
SchoolYear: 2025
Save_as: courses/mathematics/2025/course-1.html
URL: courses/mathematics/2025/course-1.html

Welcome to the Calculus Course for the year 2025. This course covers the fundamentals of calculus...
✔️ The metadata at the top (Type, Subject, SchoolYear) is what allows us to identify a page type, category and subcategory and filter pages later in the templates
✔️ (URL, Save_as, ) gives us more control about saving the files
✔️ you can add other metadata if you want, like description, path to thumbnail..., and all will be accessible to the template
✔️ This page will automatically be saved as: output/courses/mathematics/2025/course-1.html
5. Creating the Illusion of Categories and Subcategories
Here’s the trick:
- Subjects act as categories.
- School years act as subcategories.
And it all comes from the metadata
When you build the site, Pelican will automatically generate:
output/
├── courses/
│   ├── mathematics/
│   │   ├── 2025/
│   │   │   └── calculus.html
│   │   └── 2024/
│   │       └── algebra.html
│   └── physics/
│       └── 2025/
│           └── mechanics.html
You’ve now created categories and subcategories without using Pelican’s built-in categories.
6. Building the Website
Run the following command to generate your site:
pelican content
Pelican will create the output/ folder containing your static site.
You can preview it using:
pelican --listen --autoreload --port 8001
Visit http://localhost:8001 to see your site in action.
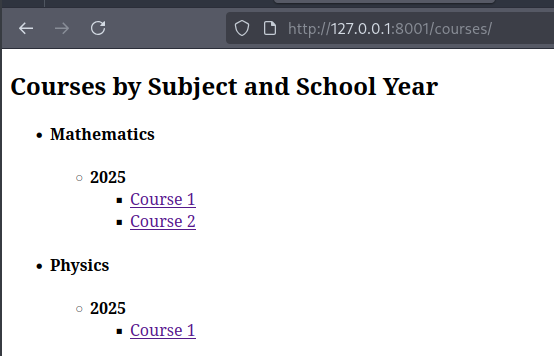
7. Navigating the Structure on Your Website
Since we configured pelican to find a direct template courses
we create it in the templates folder exactly named "courses.html"
and then , go crazy with your code, do something like:
<h2 class="mb-4">Browse All Courses</h2>

<div class="container mt-5">
    <h2 class="mb-4">Courses by Subject and School Year</h2>
    {% set subjects = pages | selectattr('metadata.type', 'equalto', 'course') | map(attribute='metadata.subject') | unique | sort %}
    <ul class="list-group">
        {% for subject in subjects %}
            <li class="list-group-item mb-3">
                <h4 class="mb-2">{{ subject | title }}</h4>
                {% set schoolyears = pages
                    | selectattr('metadata.type', 'equalto', 'course')
                    | selectattr('metadata.subject', 'equalto', subject)
                    | map(attribute='metadata.schoolyear')
                    | unique | sort %}
                <ul class="ml-4">
                    {% for year in schoolyears %}
                        <li class="mb-2">
                            <strong>{{ year.replace('-', ' ') | title }}</strong>
                            {% set courses = pages
                                | selectattr('metadata.type', 'equalto', 'course')
                                | selectattr('metadata.subject', 'equalto', subject)
                                | selectattr('metadata.schoolyear', 'equalto', year)
                                | sort(attribute='date', reverse=True) %}
                            <ul class="ml-4">
                                {% for course in courses %}
                                    <li class="mb-1">
                                        <a href="{{ SITEURL }}/{{ course.url }}" class="text-decoration-none text-primary">
                                            {{ course.title or course.metadata.coursetitle }}
                                        </a>
                                    </li>
                                {% endfor %}
                            </ul>
                        </li>
                    {% endfor %}
                </ul>
            </li>
        {% endfor %}
    </ul>
</div>
We go directly to http://localhost:8001/courses to see it in action.
8. Final Thoughts
By combining:
Rich metadata in your Markdown files
A clean folder hierarchy
Dynamic template filtering
You can build the illusion of a fully categorized, subcategorized website without using databases or complex backends.
It’s fast.
It’s secure.
It’s flexible.
You now have the power to create a blazing-fast static site that rivals, and in many ways outperforms, dynamic CMS platforms.
If you want to extend this system later, you can easily:
Add pagination
Track views
Create search pages using plugins like
tipue_search
Recent Articles


Boosting LaTeX Editing with Custom Vim Mappings
23 Nov 2025


Most Viewed Articles


The Ultimate Vim Setup (My 2024 vimrc ) : Essential Commands, Configurations, and Plugin Tips
Views: 1.09K
12 Apr 2024
Complete Tutorial: Creating Categories and Subcategories Using Pages in Pelican
Views: 866
24 Jun 2025